
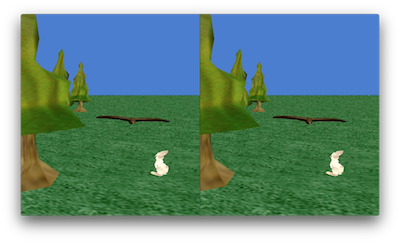
You can use Alice to make a 3D movie. The basic idea is to record the movie twice from slightly different camera locations. Viewers can see the depth in the movie by looking at each image with separate eyes. Try it on this image. You can use the Magic Eye trick, or look at it on a phone using Google Cardboard.
To make a 3D video in Alice, follow the steps below. I used Alice 2 on MacOS, but the instructions should be adaptable to other environments.
- First, the movie window size in Alice needs be an 8:9 ratio, rather than the default 4:3, because we will use iMovie to make the final product, and iMovie creates 16:9 ratio videos (widescreen). We need two images side-by-side, so an 8:9 ratio will work perfectly (a little taller than wide). You can set this in Alice 2 in the viewing angles in “seldom used properties” on the camera. The vertical viewing angle should be changed to 0.75; leave the horizontal viewing angle at 0.67.
- Next, create your Alice movie as usual.
- At the very beginning of your movie, create a duration 0 visible change (e.g. turn light brightness to 0 and then to 1). We will need this to align the timing of the left and right clips. It serves the same purpose as a clapperboard in a regular movie.
- Move the camera 0.05 m left for the viewer’s left eye.
- Play the movie, then start the video capture (command-shift-5 on Mac).
- Hit Restart on the Alice window. If you don’t see the light black out, hit restart again. Sometimes it’s not visible, so you have to keep restarting until you see the light blink.
- Stop the recording at the end of the movie.
- Move the camera 0.10 m right for the viewer’s right eye.
- Record the movie again. Make sure you see the light black out at the beginning. When you save the recording, make sure you know which clip is right and which one is left.
- Trim each clip so it begins right after the light turns on. (You can use QuickTime Player on Mac).
- Create a new project in iMovie, and add both clips. Add the right clip first so you know which is which. The one you add first is considered the main clip. Add the left clip so it overlaps with the first clip.
- Line up both clips on the left. Trim the longer clip to the length of the shorter.
- Select the upper clip and choose Split Screen.
- Share the video to a file or whatever you want.
You can watch the exported video in 3D using the “magic eye” trick if you make the window small. You can also watch the video using Google Cardboard or a similar device if you open the movie on your phone.
Example: Alice 2 file and Result video